mirror of
https://github.com/SystemRage/py-kms.git
synced 2024-11-23 00:35:38 +01:00
631 lines
36 KiB
Markdown
631 lines
36 KiB
Markdown
## Understanding Key Management Service
|
||
KMS activates Microsoft products on a local network, eliminating the need for individual computers to connect to Microsoft. To do this, KMS uses a client–server topology. KMS client locate KMS server by using DNS or a static configuration, then contact it by using Remote Procedure Call ( RPC ) and tries to activate against it.
|
||
KMS can activate both physical computers and virtual machines, but a network must meet or exceed the activation threshold ( minimum number of computers that KMS requires ). For activation, KMS clients on the network need to install a KMS client key ( General Volume License Key, GVLK ), so the product no longer asks Microsoft server but a user–defined server ( the KMS server ) which usually resides in a company’s intranet.
|
||
|
||
_py-kms_ is a free open source KMS server emulator written in python, while Microsoft gives their KMS server only to corporations that signed a Select contract. Furthermore _py-kms_ never refuses activation since is without restrictions, while the Microsoft KMS server only activates the products the customer has paid for.
|
||
|
||
_py-kms_ supports KMS protocol versions 4, 5 and 6.
|
||
Although _py-kms_ does neither require an activation key nor any payment, it is not meant to run illegal copies of Windows. Its purpose is to ensure that owners of legal copies can use their software without restrictions,
|
||
e.g. if you buy a new computer or motherboard and your key will be refused activation from Microsoft servers due to hardware changes.
|
||
|
||
Activation with _py-kms_ is achieved with the following steps:
|
||
1. Run _py-kms_ on a computer in the network ( this is KMS server or local host ).
|
||
2. Install the product on client ( or said remote host, which is the computer sending data to local host ) and enter the GVLK.
|
||
3. Configure the client to use the KMS server.
|
||
|
||
Note that KMS activations are valid for 180 days, the activation validity interval, or 30 / 45 days with consumer-only products. To remain activated, KMS client computers must renew their activation by connecting to the KMS server at least once every 180 days.
|
||
For this to work, should be to guarantee that a KMS server is always reachable for the clients on the network.
|
||
To remember you can't activate Windows 8.1 ( and above ) on a KMS server hosted on the same machine ( the KMS server must be a different computer than the client ).
|
||
|
||
## About GVLK keys
|
||
The GVLK keys for products sold via volume license contracts ( renewal every 180 days ) are published on Microsoft’s Technet web site.
|
||
|
||
* Windows: https://technet.microsoft.com/en-us/library/jj612867.aspx
|
||
|
||
* Office 2010: https://technet.microsoft.com/en-us/library/ee624355(v=office.14).aspx#section2_3
|
||
|
||
* Office 2013: https://technet.microsoft.com/en-us/library/dn385360.aspx
|
||
|
||
* Office 2016: https://technet.microsoft.com/it-it/library/dn385360(v=office.16).aspx
|
||
|
||
There are also not official keys for consumer-only versions of Windows that require
|
||
activation renewal every 45 days ( Windows 8.1 ) or 30 days ( Windows 8 ).
|
||
More complete and well defined lists are available [here](https://github.com/SystemRage/py-kms/wiki/Windows-GVLK-Keys) and [here](https://github.com/SystemRage/py-kms/wiki/Office-GVLK-Keys).
|
||
|
||
## SLMGR and OSPP commands
|
||
The software License Manager ( ```slmgr.vbs``` ) is a Visual Basic script used to configure and retrieve Volume Activation information. The script can be run locally or remotely on the target computer, using the Windows-based script host ( ```wscript.exe``` ) or the command-based script host ( ```cscript.exe``` ), and administrators can specify which script engine to use. If no script engine is specified, SLMGR runs using the default script engine ( note: it's recommended the cscript.exe script engine that resides in the system32 directory ).
|
||
The Software Licensing Service must be restarted for any changes to take effect. To restart it, can be used the Microsoft Management Console ( MMC ) Services or running the following command:
|
||
|
||
```net stop sppsvc && net start sppsvc```
|
||
|
||
The _SLMGR_ requires at least one parameter. If the script is run without any parameters, it displays Help information. The general syntax of ```slmgr.vbs``` is as follows ( using the ```cscript.exe``` as the script engine ):
|
||
|
||
```
|
||
cscript slmgr.vbs /parameter
|
||
cscript slmgr.vbs [ComputerName] [User] [Password] [Option]
|
||
```
|
||
where command line options are:
|
||
```
|
||
[ComputerName] Name of a remote computer ( default is local computer ).
|
||
[User] Account with the required privilege on the remote computer.
|
||
[Password] Password for the account with required privileges on the remote compute.
|
||
[Option] Options are shown in the table below.
|
||
```
|
||
|
||
Following tables lists _SLMGR_ more relevant options and a brief description of each. Most of the parameters configure the KMS host.
|
||
|
||
<table width="700" cellspacing="0" cellpadding="0">
|
||
<colgroup>
|
||
<col span="1" width="250">
|
||
<col span="1" width="450">
|
||
</colgroup>
|
||
<thead><tr><th>Global options</th><th>Description</th></tr></thead>
|
||
<tbody>
|
||
<tr>
|
||
<td>/ipk <<i>ProductKey</i>></td>
|
||
<td>Attempts to install a 5×5 <i>ProductKey</i> for Windows or other application identified by the <i>ProductKey</i>. If the key is valid, this is installed. If a key is already installed, it's silently replaced.</td>
|
||
</tr>
|
||
<tr>
|
||
<td>/ato [<i>ActivationID</i>]</td>
|
||
<td>Prompts Windows to attempt online activation, for retail and volume systems with KMS host key. Specifying the <i>ActivationID</i> parameter isolates the effects of the option to the edition associated with that value.</td>
|
||
</tr>
|
||
<tr>
|
||
<td>/dli [<i>ActivationID</i> | <i>All</i>]</td>
|
||
<td>Display license information. Specifying the <i>ActivationID</i> parameter displays the license information for the specified edition associated with that <i>ActivationID</i>. Specifying <i>All</i> will display all applicable installed products’ license information. Useful for retrieve the current KMS activation count from the KMS host.</td>
|
||
</tr>
|
||
<tr>
|
||
<td>/dlv [<i>ActivationID</i> | <i>All</i>]</td>
|
||
<td>Display detailed license information.</td>
|
||
</tr>
|
||
<tr>
|
||
<td>/xpr [<i>ActivationID</i>]</td>
|
||
<td>Display the activation expiration date for the current license state.</td>
|
||
</tr>
|
||
</tbody>
|
||
</table>
|
||
|
||
<table width="700" cellspacing="0" cellpadding="0">
|
||
<colgroup>
|
||
<col span="1" width="250">
|
||
<col span="1" width="450">
|
||
</colgroup>
|
||
<thead><tr><th>Advanced options</th><th>Description</th></tr></thead>
|
||
<tbody>
|
||
<tr>
|
||
<td>/cpky</td>
|
||
<td>Some servicing operations require the product key to be available in the registry during Out-of-Box Experience ( OOBE ) operations. So this option removes the product key from the registry to prevent from being stolen by malicious code.</td>
|
||
</tr>
|
||
<tr>
|
||
<td>/ilc <<i>LicenseFile</i>></td>
|
||
<td>Installs the <i>LicenseFile</i> specified by the required parameter.</td>
|
||
</tr>
|
||
<tr>
|
||
<td>/rilc</td>
|
||
<td>Reinstalls all licenses stored in <i>%SystemRoot%\system32\oem</i> and <i>%SystemRoot%\System32\spp\tokens</i>.</td>
|
||
</tr>
|
||
<tr>
|
||
<td>/rearm</td>
|
||
<td>Resets the activation timers.</td>
|
||
</tr>
|
||
<tr>
|
||
<td>/rearm-app <<i>ApplicationID</i>></td>
|
||
<td>Resets the licensing status of the specified application.</td>
|
||
</tr>
|
||
<tr>
|
||
<td>/rearm-sku <<i>ApplicationID</i>></td>
|
||
<td>Resets the licensing status of the specified <i>SKU</i>.</td>
|
||
</tr>
|
||
<tr>
|
||
<td>/upk [<i>ActivationID</i>]</td>
|
||
<td>Uninstalls the product key of the current Windows edition. After a restart, the system will be in an unlicensed state unless a new product key is installed.</td>
|
||
</tr>
|
||
<tr>
|
||
<td>/dti [<i>ActivationID</i>]</td>
|
||
<td>Displays installation ID for offline activation of the KMS host for Windows ( default ) or the application that is identified when its <i>ActivationID</i> is provided.</td>
|
||
</tr>
|
||
<tr>
|
||
<td>/atp [<i>ConfirmationID</i>][<i>ActivationID</i>]</td>
|
||
<td>Activate product with user-provided <i>ConfirmationID</i>.</td>
|
||
</tr>
|
||
</tbody>
|
||
</table>
|
||
|
||
<table width="750" cellspacing="0" cellpadding="0">
|
||
<colgroup>
|
||
<col span="1" width="250">
|
||
<col span="1" width="450">
|
||
</colgroup>
|
||
<thead><tr><th>KMS client options</th><th>Description</th></tr></thead>
|
||
<tbody>
|
||
<tr>
|
||
<td>/skms <<i>Name</i>[:<i>Port</i>] | : <i>port</i>> [<i>ActivationID</i>]</td>
|
||
<td>Specifies the name and the port of the KMS host computer to contact. Setting this value disables auto-detection of the KMS host. If the KMS host uses IPv6 only, the address must be specified in the format [<i>hostname</i>]:<i>port</i>.</td>
|
||
</tr>
|
||
<tr>
|
||
<td>/skms-domain <<i>FQDN</i>> [<i>ActivationID</i>]</td>
|
||
<td>Sets the specific DNS domain in which all KMS SRV records can be found. This setting has no effect if the specific single KMS host is set with the /skms option. Use this option, especially in disjoint namespace environments, to force KMS to ignore the DNS suffix search list and look for KMS host records in the specified DNS domain instead. </td>
|
||
</tr>
|
||
<tr>
|
||
<td>/ckms [<i>ActivationID</i>]</td>
|
||
<td>Removes the specified KMS hostname, address, and port information from the registry and restores KMS auto-discovery behavior.</td>
|
||
</tr>
|
||
<tr>
|
||
<td>/skhc</td>
|
||
<td>Enables KMS host caching ( default ), which blocks the use of DNS priority and weight after the initial discovery of a working KMS host. If the system can no longer contact the working KMS host, discovery will be attempted again.</td>
|
||
</tr>
|
||
<tr>
|
||
<td>/ckhc</td>
|
||
<td>Disables KMS host caching. This setting instructs the client to use DNS auto-discovery each time it attempts KMS activation ( recommended when using priority and weight ).</td>
|
||
</tr>
|
||
<tr>
|
||
<td>/sai <<i>ActivationInterval</i>></td>
|
||
<td>Changes how often a KMS client attempts to activate itself when it cannot find a KMS host. Replace <i>ActivationInterval</i> with a number of minutes between 15 minutes an 30 days. The default setting is 120.</td>
|
||
</tr>
|
||
<tr>
|
||
<td>/sri <<i>RenewalInterval</i>></td>
|
||
<td>Changes how often a KMS client attempts to renew its activation by contacting a KMS host. Replace <i>RenewalInterval</i> with a number of minutes between 15 minutes an 30 days. The default setting is 10080 ( 7 days ).</td>
|
||
</tr>
|
||
<tr>
|
||
<td>/sprt <<i>PortNumber</i>></td>
|
||
<td>Sets the TCP communications port on a KMS host. It replaces PortNumber with the TCP port number to use. The default setting is 1688.</td>
|
||
</tr>
|
||
<tr>
|
||
<td>/sdns</td>
|
||
<td>Enables automatic DNS publishing by the KMS host.</td>
|
||
</tr>
|
||
<tr>
|
||
<td>/cdns</td>
|
||
<td>Disables automatic DNS publishing by a KMS host.</td>
|
||
</tr>
|
||
<tr>
|
||
<td>/spri</td>
|
||
<td>Sets the priority of KMS host processes to <i>Normal</i>.</td>
|
||
</tr>
|
||
<tr>
|
||
<td>/cpri</td>
|
||
<td>Set the KMS priority to <i>Low</i>.</td>
|
||
</tr>
|
||
<tr>
|
||
<td>/act-type [<i>ActivationType</i>] [<i>ActivationID<i/>]</td>
|
||
<td>Sets a value in the registry that limits volume activation to a single type. <i>ActivationType</i> 1 limits activation to active directory only; 2 limits it to KMS activation; 3 to token-based activation. The 0 option allows any activation type and is the default value.</td>
|
||
</tr>
|
||
</tbody>
|
||
</table>
|
||
|
||
The Office Software Protection Platform script ( ```ospp.vbs``` ) can help you to configure and test volume license editions of Office client products.
|
||
You must open a command prompt by using administrator permissions and navigate to the folder that contains the script. The script is located in the folder of Office installation ( ```\Office14``` for Office 2010, ```\Office15``` for Office 2013, ```\Office16``` for Office 2016 ):
|
||
|
||
```%installdir%\Program Files\Microsoft Office\Office15```.
|
||
|
||
If you are running 32-bit Office on a 64-bit operating system, the script is located in the folder:
|
||
|
||
```%installdir%\Program Files (x86)\Microsoft Office\Office15```.
|
||
|
||
Running _OSPP_ requires the ```cscript.exe``` script engine. To see the Help file, type the following command, and then press ENTER:
|
||
|
||
```cscript ospp.vbs /?```.
|
||
|
||
The general syntax is as follows:
|
||
|
||
```cscript ospp.vbs [Option:Value] [ComputerName] [User] [Password]```,
|
||
|
||
where command line options are:
|
||
```
|
||
[Option:Value] Specifies the option and Value to use to activate a product, install or uninstall a product key, install and display license information, set KMS host name and port, and remove KMS host. The options and values are listed in the tables below.
|
||
[ComputerName] Name of the remote computer. If a computer name is not provided, the local computer is used.
|
||
[User] Account that has the required permission on the remote computer.
|
||
[Password] Password for the account. If a user account and password are not provided, the current credentials are used.
|
||
```
|
||
|
||
<table width="750" cellspacing="0" cellpadding="0">
|
||
<colgroup>
|
||
<col span="1" width="250">
|
||
<col span="1" width="450">
|
||
</colgroup>
|
||
<thead><tr><th>Global options</th><th>Description</th></tr></thead>
|
||
<tbody>
|
||
<tr>
|
||
<td>/act</td>
|
||
<td>Activates installed Office product keys.</td>
|
||
</tr>
|
||
<tr>
|
||
<td>/inpkey:<<i>ProductKey</i>></td>
|
||
<td>Installs a <i>ProductKey</i> ( replaces existing key ) with a user-provided <i>ProductKey</i>.</td>
|
||
</tr>
|
||
<tr>
|
||
<td>/unpkey:<<i>ProductKey</i>></td>
|
||
<td>Uninstalls an installed <i>ProductKey</i> with the last five digits of the <i>ProductKey</i> to uninstall ( as displayed by the /dstatus option ).</td>
|
||
</tr>
|
||
<tr>
|
||
<td>/inslic:<<i>LicenseFile</i>></td>
|
||
<td>Installs a <i>LicenseFile</i> with user-provided path of the .xrm-ms license.</td>
|
||
</tr>
|
||
<tr>
|
||
<td>/dstatus</td>
|
||
<td>Displays license information for installed product keys.</td>
|
||
</tr>
|
||
<tr>
|
||
<td>/dstatusall</td>
|
||
<td>Displays license information for all installed licenses.</td>
|
||
</tr>
|
||
<tr>
|
||
<td>/dhistoryacterr</td>
|
||
<td>Displays the failure history for MAK / Retail activation.</td>
|
||
</tr>
|
||
<tr>
|
||
<td>/dinstid</td>
|
||
<td>Displays Installation ID for offline activation.</td>
|
||
</tr>
|
||
<tr>
|
||
<td>/actcid:<<i>ConfirmationID</i>></td>
|
||
<td>Activates product with user-provided <i>ConfirmationID</i>.</td>
|
||
</tr>
|
||
<tr>
|
||
<td>/rearm</td>
|
||
<td>Resets the licensing status for all installed Office product keys.</td>
|
||
</tr>
|
||
<tr>
|
||
<td>/rearm:<<i>ApplicationID</i>></td>
|
||
<td>Resets the licensing status for an Office license with a user-provided <i>SKUID</i> value. Use this option with the <i>SKUID</i> value specified by using the /dstatus option if you have run out of rearms and have activated Office through KMS or Active Directory-based activation to gain an additional rearm.</td>
|
||
</tr>
|
||
<tr>
|
||
<td>/ddescr:<<i>ErrorCode</i>></td>
|
||
<td>Displays the description for a user-provided <i>ErrorCode</i>.</td>
|
||
</tr>
|
||
</tbody>
|
||
</table>
|
||
|
||
<table width="750" cellspacing="0" cellpadding="0">
|
||
<colgroup>
|
||
<col span="1" width="250">
|
||
<col span="1" width="450">
|
||
</colgroup>
|
||
<thead><tr><th>KMS client options</th><th>Description</th></tr></thead>
|
||
<tbody>
|
||
<tr>
|
||
<td>/dhistorykms</td>
|
||
<td>Displays KMS client activation history.</td>
|
||
</tr>
|
||
<tr>
|
||
<td>/dcmid</td>
|
||
<td>Displays KMS client computer ID ( CMID )</td>
|
||
</tr>
|
||
<tr>
|
||
<td>/sethst:<<i>HostName</i>></td>
|
||
<td>Sets a KMS host name with a user-provided <i>HostName</i>.</td>
|
||
</tr>
|
||
<tr>
|
||
<td>/setprt:<<i>Port</i>></td>
|
||
<td>Sets a KMS port with a user-provided <i>Port</i> number.</td>
|
||
</tr>
|
||
<tr>
|
||
<td>/remhst</td>
|
||
<td>Removes KMS hostname ( sets port to default ).</td>
|
||
</tr>
|
||
<tr>
|
||
<td>/cachst:<<i>Value</i>></td>
|
||
<td>Allows or denies KMS host caching. Parameter <i>Value</i> can be TRUE or FALSE.</td>
|
||
</tr>
|
||
<tr>
|
||
<td>/actype:<<i>Value</i>></td>
|
||
<td>( Windows 8 and later only ) Sets volume activation type. Parameter <i>Value</i> can be: 1 ( for Active Directory-based ), 2 ( for KMS ), 0 ( for both ).</td>
|
||
</tr>
|
||
<tr>
|
||
<td>/skms-domain:<<i>Value</i>></td>
|
||
<td>( Windows 8 and later only ) Sets the specific DNS domain in which all KMS SRV records can be found. This setting has no effect if the specific single KMS host is set by the /sethst option. Parameter <i>Value</i> is the Fully Qualified Domain Name ( FQDN ).</td>
|
||
</tr>
|
||
<tr>
|
||
<td>/ckms-domain</td>
|
||
<td>( Windows 8 and later only ) Clears the specific DNS domain in which all KMS SRV records can be found. The specific KMS host is used if it is set by the /sethst option. Otherwise, auto-discovery of the KMS host is used.</td>
|
||
</tr>
|
||
</tbody>
|
||
</table>
|
||
|
||
## py-kms Usage
|
||
|
||
#### _How to run pykms_Server.py manually_.
|
||
***
|
||
A Linux user with ```ifconfig``` command can get his KMS IP ( Windows users can try ```ipconfig /all```).
|
||
```
|
||
user@user ~ $ ifconfig
|
||
eth0 Link encap: Ethernet HWaddr xx:xx:xx:xx.....
|
||
inet addr: 192.168.1.102 Bcast 192.168.1.255 Mask: 255.255.255.0
|
||
UP BROADCAST RUNNING MULTICAST MTU:1500 Metric:1
|
||
RX Packets: 6 errors: 0 dropped, etc.. 0
|
||
TX packets: 3 errors:0, etc.. 0
|
||
colisions: 0 txqueuelen: 1000
|
||
RX bytes: 1020 TX Bytes: 708
|
||
|
||
lo Link encap: Local Loopback
|
||
inet addr: 127.0.0.1 Mask 255.0.0.0
|
||
UP Loopback running MTU: 65536 Metric: 1
|
||
RX packets 4: errors: 0 etc 0
|
||
TX packets 4: errors: 0 etc 0
|
||
```
|
||
In the example above is 192.168.1.102, so is valid:
|
||
|
||
```user@user ~/path/to/folder/py-kms $ python pykms_Server.py 192.168.1.102 1688```
|
||
|
||
To stop _pykms_Server.py_, in the same bash window where code running, simply press CTRL+C.
|
||
Alternatively, in a new bash window, use ```kill <pid>``` command ( you can type ```ps aux``` first and have the process <pid> ) or ```killall <name_of_server>```.
|
||
|
||
#### _How to run pykms_Server.py automatically at start_.
|
||
***
|
||
If you are running a Linux distro that is using ```upstart```, you can simply manage a daemon that runs as a background process.
|
||
|
||
```sudo nano /etc/init/py-kms.conf```
|
||
|
||
Then add the following ( changing where necessary ) and save file:
|
||
```
|
||
description "py-kms"
|
||
author "SystemRage"
|
||
env PYTHON_HOME=/<dir>
|
||
env PATH=$PYTHON_HOME:$PATH
|
||
start on runlevel [2345]
|
||
stop on runlevel [016]
|
||
chdir /home/user/path/to/py-kms
|
||
exec $PYTHON_HOME/bin/python pykms_Server.py <server address> <server port> -v DEBUG --logfile /var/log/pykms_logserver.log
|
||
respawn
|
||
```
|
||
Confirm that it looks ok with: ```init-checkconf /etc/init/py-kms.conf``` and reload configuration: ```initctl reload-configuration```
|
||
|
||
Now reboot the machine ```sudo reboot``` and when you boot up your system, you can see the log file stating that your daemon is running :
|
||
|
||
```cat /var/log/pykms_logserver.log```.
|
||
|
||
Finally a few commands useful for the status of your daemon:
|
||
* restart --> this will stop, then start a service: ```sudo service py-kms restart```
|
||
* start --> this will start a service, if it's not running: ```sudo service py-kms start```
|
||
* stop --> this will stop a service, if it's running: ```sudo service py-kms stop```
|
||
* status --> this will display the status of a service: ```sudo service py-kms status```
|
||
|
||
According to OS that you are running, you can also create a daemon with ```systemd``` or ```SysV```.
|
||
|
||
If you are using Windows, to run _pykms_Server.py_ as service you need to install [pywin32](https://sourceforge.net/projects/pywin32/) then you can create a file for example named _kms-winservice.py_ and put into it this code:
|
||
|
||
```
|
||
import win32serviceutil
|
||
import win32service
|
||
import win32event
|
||
import servicemanager
|
||
import socket
|
||
import subprocess
|
||
|
||
class AppServerSvc (win32serviceutil.ServiceFramework):
|
||
_svc_name_ = "py-kms"
|
||
_svc_display_name_ = "py-kms"
|
||
_proc = None
|
||
_cmd = ["C:\Windows\Python27\python.exe", "C:\Windows\Python27\py-kms\pykms_Server.py"]
|
||
|
||
def __init__(self,args):
|
||
win32serviceutil.ServiceFramework.__init__(self,args)
|
||
self.hWaitStop = win32event.CreateEvent(None,0,0,None)
|
||
socket.setdefaulttimeout(60)
|
||
|
||
def SvcStop(self):
|
||
self.killproc()
|
||
self.ReportServiceStatus(win32service.SERVICE_STOP_PENDING)
|
||
win32event.SetEvent(self.hWaitStop)
|
||
|
||
def SvcDoRun(self):
|
||
servicemanager.LogMsg(servicemanager.EVENTLOG_INFORMATION_TYPE,
|
||
servicemanager.PYS_SERVICE_STARTED,
|
||
(self._svc_name_,''))
|
||
self.main()
|
||
|
||
def main(self):
|
||
self._proc = subprocess.Popen(self._cmd)
|
||
self._proc.wait()
|
||
|
||
def killproc(self):
|
||
self._proc.kill()
|
||
|
||
if __name__ == '__main__':
|
||
win32serviceutil.HandleCommandLine(AppServerSvc)
|
||
```
|
||
Now in a command prompt type ```C:\Windows\Python27\python.exe kms-winservice.py install``` to install the service.
|
||
Display all the services with ```services.msc``` and find the service associated with _py-kms_, changing startup type from "manual" to "auto". Finally "Start" the service.
|
||
If this approach fails, you can try to use the [Non-Sucking Service Manager](https://nssm.cc/) or Task Scheduler as described [here](https://blogs.esri.com/esri/arcgis/2013/07/30/scheduling-a-scrip/).
|
||
|
||
#### _pykms_Server.py Options_.
|
||
***
|
||
Follows a list of usable parameters:
|
||
|
||
ip <IPADDRESS>
|
||
Instructs py-kms to listen on IPADDRESS ( can be an hostname too ). If this option is
|
||
not specified, IPADDRESS 0.0.0.0 is used.
|
||
|
||
port <PORT>
|
||
Define TCP PORT the KMS service is listening on. Default is 1688.
|
||
|
||
-e or --epid <EPID>
|
||
Use EPID as Windows EPID.
|
||
Enhanced Privacy ID ( EPID ) is a cryptographic scheme for providing anonymous signatures.
|
||
If no EPID is specified, a random EPID will be generated.
|
||
|
||
-l or --lcid <LCID>
|
||
Do not randomize the locale ID part of the EPID and use LCID instead.
|
||
The Language Code Identifier ( LCID ) describes localizable information in Windows.
|
||
This structure is used to identify specific languages for the purpose of customizing
|
||
software for particular languages and cultures. For example, it can specify the way dates,
|
||
times, and numbers are formatted as strings. It can also specify paper sizes and
|
||
preferred sort order based on language elements.
|
||
The LCID must be specified as a decimal number ( example: 1049 for "Russian - Russia" ).
|
||
By default py-kms generates a valid locale ID but this may lead to a value which is
|
||
unlikely to occur in your country. You may want to select the locale ID of your country instead.
|
||
See
|
||
https://msdn.microsoft.com/en-us/library/cc233982.aspx
|
||
for a list of valid LCIDs. Note that some of them are not recognized by .NET Framework 4.0.
|
||
If an EPID is manually specified, this setting is ignored.
|
||
Default is a fixed LCID of 1033 ( English - US ).
|
||
|
||
-w or --hwid <HWID>
|
||
Use specified HWID for all products.
|
||
Hardware Identification is a security measure used by Microsoft upon the activation of
|
||
the Windows operating system. As part of the Product Activation system, a unique
|
||
HWID number is generated when the operating system is first installed. The HWID identifies
|
||
the hardware components that the system is utilizing, and this number is communicated to Microsoft.
|
||
Every 10 days and at every reboot the operating system will generate another HWID number and
|
||
compare it to the original to make sure that the operating system is still running on the same device.
|
||
If the two HWID numbers differ too much then the operating system will shut down until Microsoft
|
||
reactivates the product. The theory behind HWID is to ensure that the operating system is not being
|
||
used on any device other than the one for which it was purchased and registered.
|
||
|
||
HWID must be an 16-character string of hex characters that are interpreted as a series of 8 bytes
|
||
( big endian ). Default is "364F463A8863D35F". To auto generate the HWID, type "random".
|
||
|
||
-c or --client-count <CLIENTCOUNT>
|
||
Use this flag to specify the current CLIENTCOUNT. Default is None. Remember that a number >=25 is
|
||
required to enable activation of client OSes while for server OSes and Office >=5.
|
||
|
||
-a or --activation-interval <ACTIVATIONINTERVAL>
|
||
Instructs clients to retry activation every ACTIVATIONINTERVAL minutes if it was unsuccessful,
|
||
e.g. because it could not reach the server. The default is 120 minutes ( 2 hours ).
|
||
|
||
-r or --renewal-interval <RENEWALINTERVAL>
|
||
Instructs clients to renew activation every RENEWALINTERVAL minutes.
|
||
The default is 10080 minutes ( 7 days ).
|
||
|
||
-s or --sqlite
|
||
Use this option to store request information from unique clients in an SQLite database.
|
||
|
||
-t or --timeout <TIMEOUT>
|
||
Disconnect clients after time of inactivity ( in seconds ). The default is 30 seconds.
|
||
|
||
-V or --loglevel <{CRITICAL, ERROR, WARNING, INFO, DEBUG, MINI}>
|
||
Activate verbose logging. Use this flag to set a loglevel. The default is ERROR.
|
||
|
||
( example: user@user ~/path/to/folder/py-kms $ python pykms_Server.py -V INFO
|
||
produces in "pykms_logserver.log" these initial messages:
|
||
Mon, 12 Jun 2017 22:09:00 INFO TCP server listening at 0.0.0.0 on port 1688.
|
||
Mon, 12 Jun 2017 22:09:00 INFO HWID: 364F463A8863D35F )
|
||
|
||
-F or --logfile <LOGFILE>
|
||
Create a "LOGFILE.log" logging file. The default is named "pykms_logserver.log".
|
||
|
||
( example: user@user ~/path/to/folder/py-kms $ python pykms_Server.py 192.168.1.102 8080
|
||
-F ~/path/to/folder/py-kms/newfile.log -V INFO -w random
|
||
produces in "newfile.log" these initial messages:
|
||
Mon, 12 Jun 2017 22:09:00 INFO TCP server listening at 192.168.1.102 on port 8080.
|
||
Mon, 12 Jun 2017 22:09:00 INFO HWID: 58C4F4E53AE14224 )
|
||
|
||
-S or --logsize <MAXSIZE>
|
||
Use this flag to set a maximum size ( in MB ) to the output log file. Desactivated by default.
|
||
|
||
#### _pykms_Client.py Options_.
|
||
***
|
||
If something does not work, it may have the cause that _py-kms_ server does not work correctly. You can test this with the KMS client _pykms_Client.py_, running on the same machine where you started _pykms_Server.py_.
|
||
For example ( in separated bash windows ) run these commands:
|
||
```
|
||
user@user ~/path/to/folder/py-kms $ python pykms_Server.py -V DEBUG
|
||
user@user ~/path/to/folder/py-kms $ python pykms_Client.py 0.0.0.0 1688 -V DEBUG
|
||
```
|
||
or if you want better specify:
|
||
```
|
||
user@user ~/path/to/folder/py-kms $ python pykms_Server.py YOUR_IPADDRESS 1688 -V DEBUG
|
||
user@user ~/path/to/folder/py-kms $ python pykms_Client.py YOUR_IPADDRESS 1688 -V DEBUG
|
||
```
|
||
You can also put further parameters as defined below:
|
||
|
||
ip <IPADDRESS>
|
||
Define IPADDRESS ( or hostname ) of py-kms' KMS Server. This parameter is always required.
|
||
|
||
port <PORT>
|
||
Define TCP PORT the KMS service is listening on. Default is 1688.
|
||
|
||
-m or --mode <PRODUCTNAME>
|
||
Use this flag to manually specify a Microsoft PRODUCTNAME for testing the KMS server.
|
||
The default is Windows81.
|
||
|
||
-c or --cmid <CMID>
|
||
Use this flag to manually specify a CMID to use. If no CMID is specified, a random one
|
||
will be generated.
|
||
The Microsoft KMS host machine identifies KMS clients with a unique Client Machine ID
|
||
( CMID, example: ae3a27d1-b73a-4734-9878-70c949815218 ). For a KMS client to successfully
|
||
activate, the KMS server needs to meet a threshold, which is a minimum count for KMS clients.
|
||
Once a KMS server records a count which meets or exceeds threshold, KMS clients will begin to
|
||
activate successfully. Each unique CMID recorded by KMS server adds towards the count threshold
|
||
for KMS clients. This are retained by the KMS server for a maximum of 30 days after the
|
||
last activation request with that CMID. Note that duplicate CMID only impacts on KMS server
|
||
machine count of client machines. Once KMS server meets minimum threshold, KMS clients will
|
||
activate regardless of CMID being unique for a subset of specific machines or not.
|
||
|
||
-n or --name <MACHINENAME>
|
||
Use this flag to manually specify an ASCII MACHINENAME to use. If no MACHINENAME is specified
|
||
a random one will be generated.
|
||
|
||
-V or --loglevel <{CRITICAL, ERROR, WARNING, INFO, DEBUG, MINI}>
|
||
Activate verbose logging. Use this flag to set a loglevel. The default is ERROR.
|
||
|
||
-F of --logfile <LOGFILE>
|
||
Create a "LOGFILE.log" logging file. The default is named "pykms_logclient.log".
|
||
|
||
-S or --logsize <MAXSIZE>
|
||
Use this flag to set a maximum size ( in MB ) to the output log file. Desactivated by default.
|
||
|
||
## Activation Procedure
|
||
Briefly the product asks for a key during installation, so it needs to enter the GVLK. Then user can set connection parameters, while KMS server must already be running on server machine. Finally with specific commands activation occurs automatically and can be extended later every time for another 180 ( or 45 ) days.
|
||
|
||
#### _Windows_
|
||
***
|
||
|
||
|
||
|
||
|
||
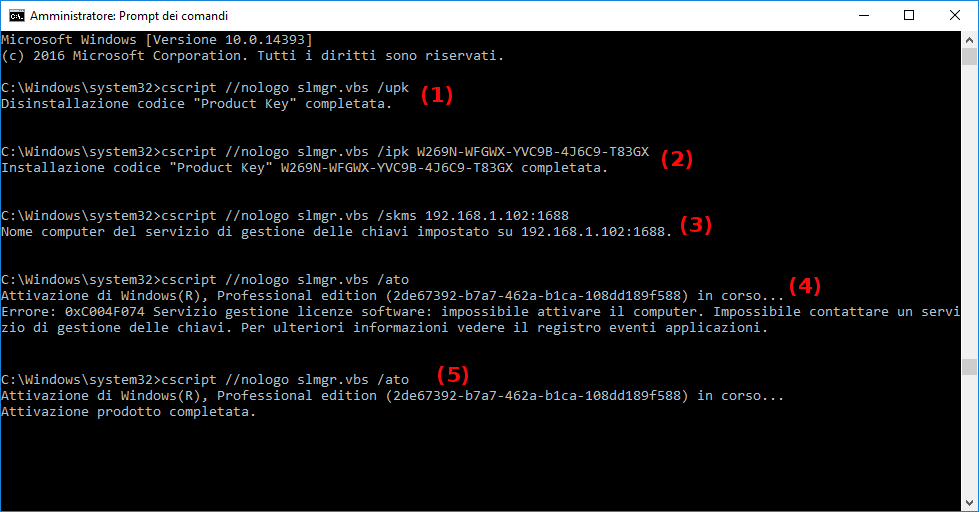
0. Run a Command Prompt as Administrator ( you are directly in ```C:\Windows\System32``` path ).
|
||
|
||
```//nologo``` option of ```cscript``` needs only to hide startup logo.
|
||
|
||
1. This is facoltative, it's for unistalling existing product key.
|
||
2. Then put your product's GVLK.
|
||
3. Set connection parameters.
|
||
4. Try online activation, but... if that fails with error ```0xC004F074``` you’ll most likely have to configure your firewall that it accepts incoming connections on TCP port 1688.
|
||
So for Linux users ( server-side with pykms_Server.py running ): ```sudo ufw allow 1688``` ( to remove this rule ```sudo ufw delete allow 1688``` )
|
||
5. Attempt online activation ( with now traffic on 1688 enabled ).
|
||
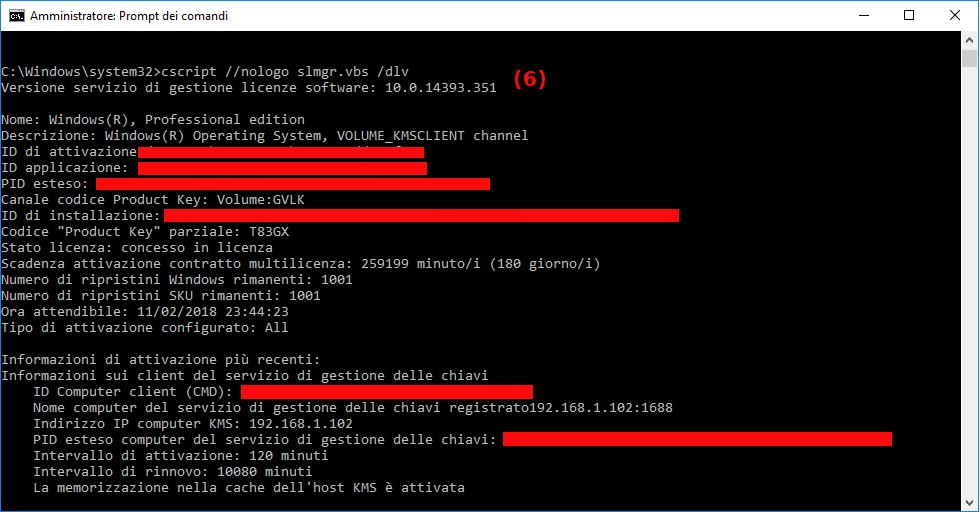
6. View license informations ( facoltative ).
|
||
|
||
#### _Office_
|
||
***
|
||
Note that you’ll have to install a volume license ( VL ) version of Office. Office versions downloaded from MSDN and / or Technet are non-VL.
|
||
|
||
|
||
|
||
|
||
|
||
|
||
|
||
|
||
|
||
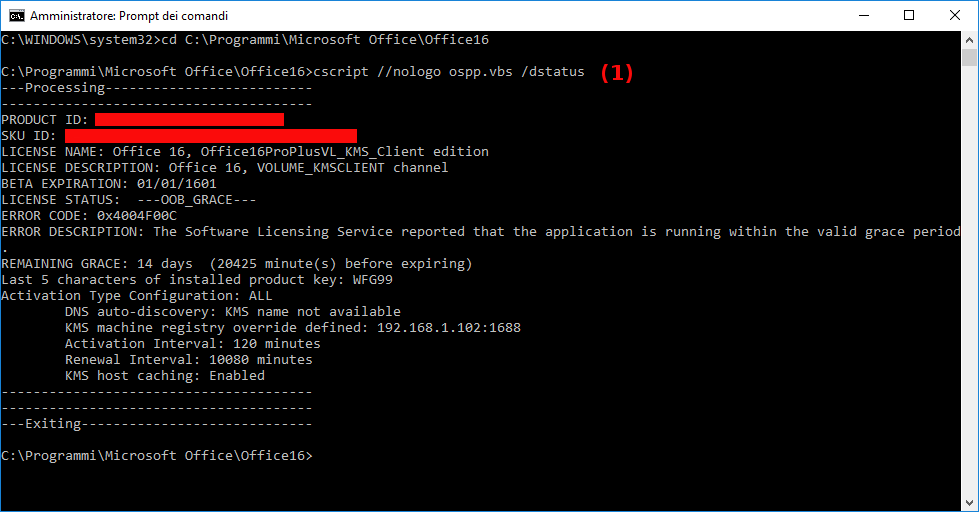
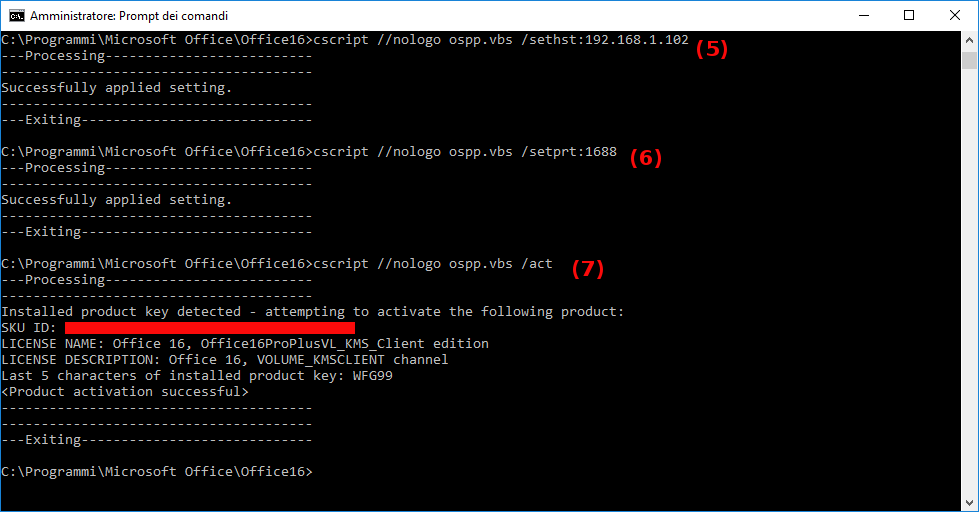
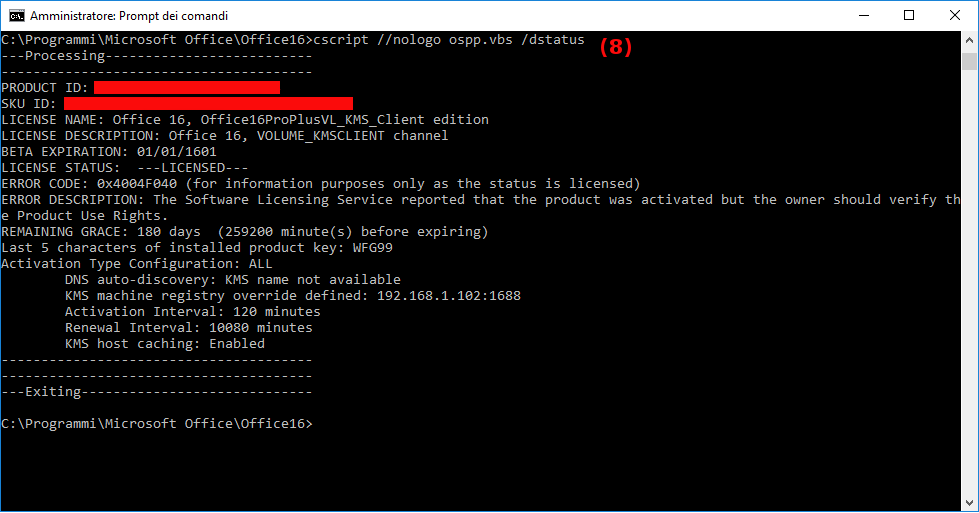
0. Run a Command Prompt as Administrator and navigate to Office folder ```cd C:\ProgramFiles\Microsoft Office\OfficeXX``` (64-bit path) or ```cd C:\ProgramFiles(x86)\Microsoft Office\OfficeXX``` (32-bit path), where XX = 14 for Office 2010, 15 for Office 2013, 16 for Office 2016 or Office 2019.
|
||
1. As you can see, running ```/dstatus```, my Office is expiring ( 14 days remaining ).
|
||
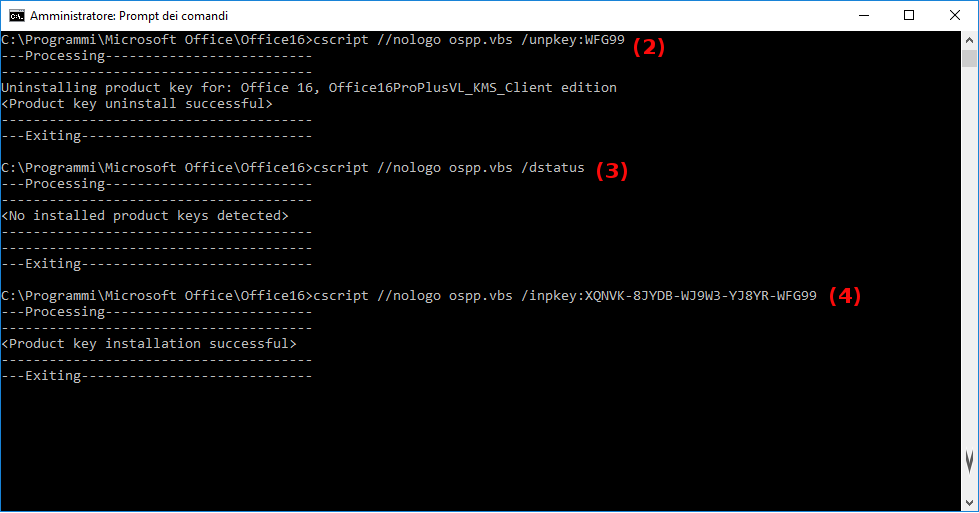
2. Only for example, let's go to uninstall this product.
|
||
3. This is confirmed running ```/dstatus``` again.
|
||
4. Now i put my product's GVLK ( and you your key ).
|
||
5. Set the connection parameter KMS server address.
|
||
6. Set the connection parameter KMS server port.
|
||
7. Activate installed Office product key.
|
||
8. View license informations ( in my case product is now licensed and remaining grace 180 days as expected ).
|
||
|
||
## Supported Products
|
||
Note that it is possible to activate all versions in the VL ( Volume License ) channel, so long as you provide the proper key to let Windows know that it should be activating against a KMS server. KMS activation can't be used for Retail channel products, however you can install a VL product key specific to your edition of Windows even if it was installed as Retail. This effectively converts Retail installation to VL channel and will allow you to activate from a KMS server. This is not valid for Office's products, so Office, Project and Visio must be volume license versions. Newer version may work as long as the KMS protocol does not change.
|
||
|
||
## Documentation
|
||
* <sup>[1]</sup> https://forums.mydigitallife.net/threads/emulated-kms-servers-on-non-windows-platforms.50234
|
||
* <sup>[2]</sup> https://forums.mydigitallife.net/threads/discussion-microsoft-office-2019.75232
|
||
* <sup>[3]</sup> https://forums.mydigitallife.net/threads/miscellaneous-kms-related-developments.52594
|
||
* <sup>[4]</sup> https://forums.mydigitallife.net/threads/kms-activate-windows-8-1-en-pro-and-office-2013.49686
|
||
* <sup>[5]</sup> https://github.com/myanaloglife/py-kms
|
||
* <sup>[6]</sup> https://github.com/Wind4/vlmcsd
|
||
* <sup>[7]</sup> https://github.com/ThunderEX/py-kms
|
||
* <sup>[8]</sup> https://github.com/CNMan/balala/blob/master/pkconfig.csv
|
||
* <sup>[9]</sup> http://www.level7techgroup.com/docs/kms_overview.pdf
|
||
* <sup>[10]</sup> https://www.dell.com/support/article/it/it/itbsdt1/sln266176/windows-server-using-the-key-management-service-kms-for-activation-of-volume-licensed-systems?lang=en
|
||
* <sup>[11]</sup> https://social.technet.microsoft.com/Forums/en-US/c3331743-cba2-4d92-88aa-9633ac74793a/office-2010-kms-current-count-remain-at-10?forum=officesetupdeployprevious
|
||
* <sup>[12]</sup> https://betawiki.net/wiki/Microsoft_Windows
|
||
* <sup>[13]</sup> https://thecollectionbook.info/builds/windows
|
||
* <sup>[14]</sup> https://www.betaarchive.com/forum/viewtopic.php%3Ft%3D29131+&cd=10&hl=it&ct=clnk&gl=it
|
||
* <sup>[15]</sup> https://www.google.com/url?sa=t&rct=j&q=&esrc=s&source=web&cd=12&cad=rja&uact=8&ved=2ahUKEwjmvZihtOHeAhVwyoUKHSjeD5Q4ChAWMAF6BAgHEAI&url=ftp%3A%2F%2Flynas.ittc.vu.lt%2Fpub%2FMicrosoft%2FWindows%2520Vista%2FWindows%2520Vista_Volume_Activation_2.0%2FWindows%2520Vista%2520Volume%2520Activation%2FWindows%2520Vista_Volume_Activation_2.0%2Fvolume%2520activation%25202%25200%2520step-by-step%2520guide.doc&usg=AOvVaw3kqhCu3xT-3r416DRGUUs_
|
||
* <sup>[16]</sup> https://www.itprotoday.com/windows-78/volume-activation-server-2008
|
||
* <sup>[17]</sup> https://docs.microsoft.com/en-us/windows-server/get-started-19/activation-19
|
||
* <sup>[18]</sup> https://docs.microsoft.com/en-us/windows-server/get-started/windows-server-release-info
|
||
* <sup>[19]</sup> https://support.microsoft.com/en-us/help/13853/windows-lifecycle-fact-sheet |